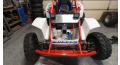
Preparing for an upcoming trip to Pismo Beach, I decided to perform some upgrades on my backup Honda Odyssey FL350. One significant improvement I wanted to make was swapping out the opaque black radiator hoses for clear tubing. This modification not only enhances the visual appeal but also allows for easy monitoring of coolant flow and early detection of potential issues.
In this blog post, I'll walk you through the process of replacing the radiator hoses with clear tubing, explain the benefits of this upgrade, and share some tips based on my experience.
Why Switch to Clear Radiator Hoses?
Visibility and Monitoring
- Coolant Flow: Clear hoses enable you to see the coolant moving through the system, allowing you to confirm that the coolant is circulating properly.
- Early Detection: Being able to spot air bubbles or discoloration can help you identify problems such as air locks or contamination before they lead to more significant issues.
- Maintenance: Clear hoses make it easier to check the coolant level, ensuring that your engine stays adequately cooled.
Aesthetics
- Modern Look: Clear tubing gives your engine bay a clean, updated appearance.
- Customization: You can pair clear hoses with colored coolant to match your vehicle's color scheme or personal style.
Tools and Materials Needed
- Clear PVC Tubing: Ensure the tubing is suitable for coolant systems and can withstand the operating temperatures.
- Hose Clamps: Appropriate sizes for securing the new hoses.
- Coolant: Fresh coolant to refill the system after installation.
- Drain Pan: To catch old coolant during the draining process.
- Screwdrivers and Pliers: For loosening and tightening clamps.
- Heat Gun or Warm Water: To soften the tubing for easier installation.
Step-by-Step Guide to Replacing Radiator Hoses
Step 1: Safety First
- Cool Engine: Ensure the engine is completely cool before starting to avoid burns from hot coolant.
- Disconnect Battery: For additional safety, disconnect the battery to prevent any electrical accidents.
Step 2: Drain the Coolant
- Place Drain Pan: Position a drain pan under the lower radiator hose connection.
- Remove Lower Hose: Carefully loosen the clamp and detach the lower hose to allow the coolant to drain.
- Dispose of Old Coolant: Properly dispose of the old coolant according to local regulations.
Step 3: Remove Old Hoses
- Upper Hose: Loosen the clamps and remove the upper radiator hose.
- Inspect Connections: Check the radiator and engine ports for any corrosion or debris and clean them as necessary.
Step 4: Prepare the Clear Tubing
- Measure and Cut: Use the old hoses as a template to measure and cut the new clear tubing to the appropriate lengths.
- Soften Tubing Ends: Clear PVC tubing can be stiff. Use a heat gun on a low setting or soak the ends in warm water to make them more pliable.
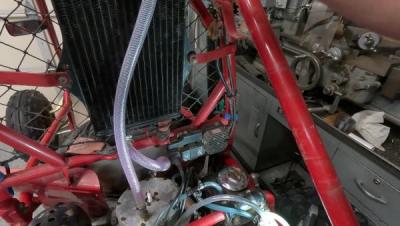
Step 5: Install the New Hoses
- Attach Lower Hose: Fit one end of the clear tubing onto the lower radiator port and secure it with a hose clamp. Connect the other end to the engine port and secure it.
- Attach Upper Hose: Repeat the process for the upper hose.
- Ensure Proper Fit: Make sure the hoses are fully seated on the ports and the clamps are tight to prevent leaks.
Step 6: Refill the Cooling System
- Add Coolant: Pour fresh coolant into the radiator until it reaches the recommended level.
- Bleed the System: If necessary, bleed the cooling system to remove any air pockets that could hinder performance.
Step 7: Check for Leaks
- Start the Engine: With the radiator cap off, start the engine and let it reach operating temperature.
- Monitor Coolant Flow: Observe the clear hoses for coolant flow and any air bubbles.
- Inspect Connections: Check all hose connections for signs of leakage and tighten clamps if needed.
Additional Tips
- Fuel Lines: Consider replacing your fuel lines with clear tubing as well. This allows you to monitor fuel flow and detect
- issues like clogged pickup lines or air in the system.
- Regular Maintenance: Clear hoses can become discolored or stiff over time. It's advisable to replace them every few years to maintain clarity and flexibility.
- Heat Resistance: Ensure the clear tubing you select is rated for the temperatures it will encounter in your engine bay to prevent melting or degradation.
Collaborations and Community Projects
Recently, we partnered with the popular YouTube channel Cars and Cameras on an exciting Honda Odyssey build. They acquired an Odyssey at a swap meet and have been transforming it over the past few months. We contributed by providing a Bishop Precision water-cooled cylinder head and custom fenders. Other collaborators like Methodical Fabricator and SmartCarb have also added their expertise to the project.
Check out their latest video here to see the progress, and stay tuned for more updates and collaborations in the future.
Conclusion
Swapping out the black rubber radiator hoses for clear tubing on your Honda Odyssey FL350 is a worthwhile upgrade that enhances both function and form. Not only does it allow for real-time monitoring of your cooling system, but it also adds a customized look to your vehicle.
If you found this guide helpful, please give it a like and consider subscribing for more DIY projects and updates. Feel free to share your own experiences or ask questions in the comments below.
Thanks for reading, and happy riding!